Saturday, 5 March 2016

A quick post of some country Life makes...

Hi everyone!
This morning's post is a quickie! I'm going to let you have a sneak peak at one or two samples I have been making from this new range!
First off is an 8x8 layout. This range has a lovely rustic feel and the papers have a beautiful tactile linen texture to them! As you can see they work well in scrapbooking and are ideal for adorning your more rural endevours lol!


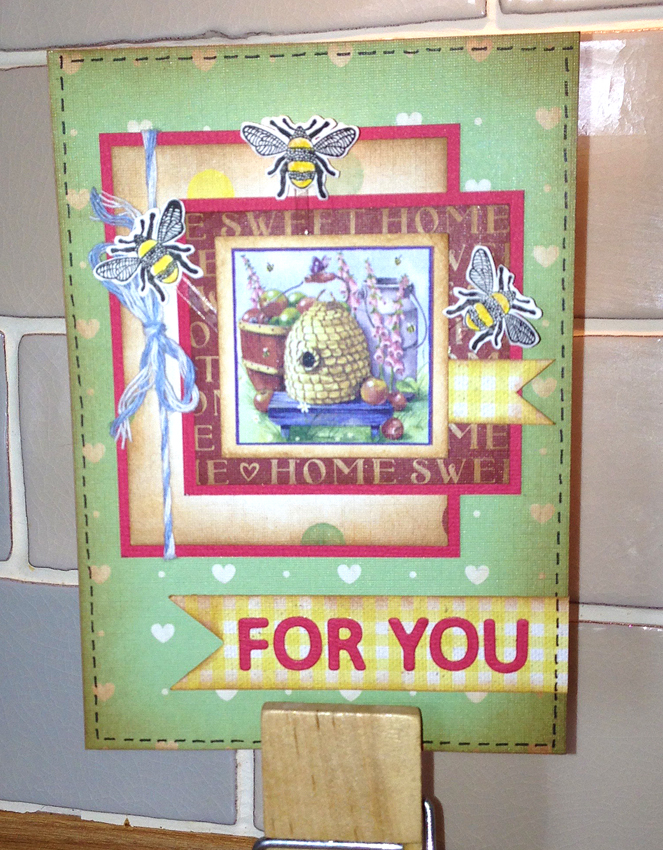
The range also features a wooden block stamp set. Here I've used the bee. I stamped in black and added a bit of yellow pencil to colour their stripes. Cute!


On this one the little bees are attached with acetate so they hover!! Fun!!


This one features some hexagonal die cuts! Quick and easy!


And this one features a sweet little pinwheel made from 2 layers cut from a small die
stuck back to back.


Today I contacted the store I'm demonstrating in next week only to find that they are expecting Easter cards as they are promoting a lot of Easter craft supplies this month. So it looks like I'm gonna be busy with plan B this week adapting my designs to have a more seasonal theme. Better get cracking (lol! See what I did there...)!!!
Have lots of crafty fun this weekend!
Jak xxx

Monday, 29 February 2016

A box of goodies has arrived...

It's time for another round of DoCrafts demonstrating at The Range  - I'm booked for the 12th March - here's a pic of what I've been sent to work with...


So, what's in there? There's a new range called Country Life and as the title hints at, it's got a vintagey country theme about it with lots of gingham papers and hens, bees etc, all with a lovely linen texture. I've had a go and made a few cards and I especially loved playing with the acetate which has an interesting chicken wire print on it! I feel I need to try it all out on a scrapbook layout though - just to show it's versatility. It works so well with a bit of Kraft too! There's lots of cute little dies in there too - great for a bit of bunting and alphas an ideal size for cardmakers! There's a few bits in pieces still to come too - some new Geometric papers, this time in a Mocha colourway and also I get a preview of the upcoming Goody Bag which is always great value for money. So without further ado, I'm off to get crafty and make some mess! Come back later for a sneak peak at some samples I've made up!!
Thanks for stopping by,
Jak, xxx

Tuesday, 23 February 2016

And a Geo Neon scrapbook page!

    So, there I was, tidying up the mess I'd made at the craft table with my Geometric Neon set when I felt the urge to do a 12x12...
    I had some scraps lying about and a photo to hand and I literally started just shuffling bits around. One thing led to another and a few spritzes of watered down paint later I had finished this. I really love these papers with their little zing of neon...sometimes, occasionally, less really is more! My apologies for the terrible photography, my phone struggles taking pics with high contrast indoors...


A close up os some details!
Hope you enjoyed this cheeky wee bonus post this week!!!
Have fun everyone!!
Jak
xxx

Monday, 22 February 2016

Geometric Neon Pt 2 - having another go with this....

Well, Hello again!
Don't you just hate it when you feel you've not got quite as much out of something as you expected to, well, that's me with the Papermania Geometric Neon A4 Ultimate Paper Pack!! I felt I hadn't done it any justice. I'd been sent it as part of a kit I had been asked to demo at a local store and as soon as I saw the colours I was so excited as I just love a hit of colour. So, I got to work and came up with a quite a few samples for sharing and demonstrating on the day. Only thing was, I kind of struggled with finding a really visual focal point for my makes. The day of the demo went well tho' , I was really busy and left quite a few samples for the store to display alongside the product lines. Fast forward a few weeks and I started looking at this range all over again. Now, I am the first to admit that I'm not much of a stamper, so I did initially struggle incorporating the stamps that partnered this range. I find that unless it's a sentiment or really bold graphic, I'm not much cop with them, lol! I think it's just my graphic designer ways, plus I'm used to using a computer for design which means you can make everything any size you like, lol! Anyhoo, I definitely wanted to come up with a really bold way of embellishing and complimenting these papers so I went away and designed some graphic style toppers and cut them out on the Silhouette. Yay! I'm really pleased with how they turned out and today I made up a few cards to see how they worked.

The diecuts. Lots left over for plenty more.


What do you think? For me, the toppers just bring the whole colour and design thing together in a bold way with lots of impact. To compare, here's another one I made up just using the paper pack alone.


It's still nice but I prefer the pop of the big Neon graphic!!! There's still lots of this kit left so it looks like I'm going to be busy if I'm going to use it up!!
Thanks for popping by again!
Jak :-)

Sunday, 21 February 2016

Makes for a "Get Well Soon"!

   ...So, my mum was in hospital having some hip surgery done just recently and that gave me a good enough excuse to spend a bit of time making a card and a little minibook to help cheer her up. I had seen a feature in issue 67 of the DoCrafts Creativity magazine which was about making a long extended card using their Floral Folk range and I thought I could definitely use this as my inspiration for the card shape and use whatever papers I already had so, I opted for using my bargain A4 pack of Simply Floral papers which I picked up in HobbyCraft half price for about £6 - I do so love a bargain! I really like this DoCrafts range as it is so colourful and there's a lot of contrast in the papers. What I mean by this is some of the papers use lighter colours and smaller repeat patterns and others have really strong backgrounds with big almost cabbage style roses. I find this makes a kit easier for working with as the papers work together in a complimentary way instead of fighting for harmony and being a bit hard work on the eye...
   So without further ado, here is what I rustled up!

Front cover. 

You can see how it folds out giving 8 different surfaces to decorate!
The front cover has been decorated with the Simply floral range mainly,  but there are few other elements in there to help it out. I have a dovecraft paper doily in the background and an Anna Griffin blue bird stamped at the top left corner, the wooden word "love" is from a pack I bought from The Works which was only a quid! Bargain again!!!


As you can see, the colours are so pretty and work cohesively over the whole little minibook. For the rest of the pages I worked out which colours I wanted to use in sequence first by stamping a floral background and then inking the edges in a distressed way just to give the background a helping hand so it wasn't overpowered by the embellishing! One additional decoration I did use was a moroccan trellis I designed and cut with my Silhouette. It just pulls it all together although it's not featured on every page. The big roses are cut out from the SF patterned papers (- oooh, they're lush - yum!) and any butterflies are Anna Griffin again - inks, mainly by American Crafts - they are those little square pigment ink ones that smell like paint and yes, they were another bargain again, this time from TK MAXX. 
The kit I used for the basis of my projects!    Image © DoCrafts


Background Stamp    Image © DoCrafts


    It struck me when I first came across this range by DoCrafts that it would probably work with some of the Anna Griffin stuff I already have and I was right. Phew! I love it when things work together because when you first start scrapbooking, the tendency, well certainly in my case, is to splurge randomly on all sorts of things that catch your eye - it does take a while to be able to look at stuff and restrain yourself from impulse buys. And then sometimes you just can't stop yourself anyway, lol!

With that completed, it needed a card to keep it company so in the same vein I made this...


The paper kit also features a bit of decoupage and diecuts which I used as a card topper here with more trellis from my Silhouette and stamping with an Anna Griffin sentiment! Done!!!
As you can't take flowers in to hospital anymore this cheered up her little corner! She loved both projects and had them displayed proudly on her little bedside locker.   


Hope you are all having a lovely crafty weekend!!!
Have fun,
Jak!!!

Friday, 12 February 2016

Scrapbooking layout...

... Hello all!
It occurred to me that lately I've been all about the cards which is something that surprises even me! So, for a change and to balance things out a bit here's a 12x12 layout hot off the crafting table... 


I've used a dark coloured cardstock that has been stamped lightly with gold ink round the edges to break up the solid colour. The papers are from a mammoth Recollections pack I picked up in TK Maxx a few months ago. I have a plastic nesting template which I drew round for the parenthesis shaped panels and added 3d pearl glue round the edges for a bit of texture. The floral and butterfly stamps are from Anna Griffin as is the pink scroll. There's also an assortment of K & Company ephemera going on too! Isn't it great that bits and bobs from kits etc bought ages ago can come together and work so well on a page so, never throw anything away lol! You never know when you might need/use it!!!


Have a great crafty weekend everyone!!
Love Jak xxx

Saturday, 30 January 2016

Welcome back!!!

Well after a busy old time over the festive season I quickly had to finish making pressies and crack on with making up samples for a DoCrafts demo I had been booked for at the start of January! This session was all about The Butterfly Dreams Compendium Kit and the Geometric Neon/mono ranges.
©DoCrafts

©DoCrafts
I think my favourite one to work with was the Geometric Neon - the colours in it are so lovely and zingy!!! There's nothing like a pop of Neon to brighten your day!!!
I stuck to some pretty straight forward samples as I like to include all crafters including the ones that have not even started yet!  I find that samples that are too complicated really put those would-be crafters off as they get overwhelmed by the process and feel they would never manage anything too advanced. So here goes with some samples...

A quick and easy sample


This was a really quick make. The background paper is actually a gold foiled vellum from the A4 Paper Pack which is beautiful! I love the honeycomb design! The topper is a journaling die cut from the pack which I cut round the pennant part tied a ribbon round and mounted on foam pads to raise slightly from the background. Simple for any crafter but very effective! The 3 circular stamp details are from an A5 stamp set that come with the current DoCraft Goody Bag. These are great for borders and details on your cards.
© DoCrafts
Next card is kind of up a notch skill wise. This one incorporates a topper made from stamping through a DoCrafts sticky mask. 
© DoCrafts


I used a neon inkpad for a matching pop of colour and cut round it and again mounted this on foam pads to raise up from the patterned background. The cute mini bunting is from the paper pack and comes foiled in places and is already diecut. All that's needed is a bit of twine to "string" it on. The border is washii tape stuck on to plain white card and cut out before raising up on adhesive foam and sticking to the card. I find that washii tape can be a bit see through for sticking on top of a patterned background and this stops the shine through as well as adding dimension.


Big pink Hello!!!

Then there was these tiny cards that were made using the Geometric Neon Mini Card Set –

© DoCrafts


These are so cute! They come as a set of notelets and envelopes with 2 stamps, but I couldn't resist combining them with the A4 Paper Pack and Geometric stamp set and used some of the die cuts to decorate. The diecut paper bows fit this size of these card perfectly!


Next, on to the Butterfly Dreams Card Compendium! This kit has everything you need to get you started making very pretty, traditional style cards - all you need is glue as it comes with its own card bases both patterned and diecut butterfly shaped ones.
Decoupage topper and diecut butterflies

more decopage this time on a patterned card base.

A diecut and stamped card base, stamped topper and decoupaged butterflies
This is a very pretty kit full of papers and diecuts,  pretty ribbons. buttons and sparkles and even comes with a teeny butterfly punch. However, its versatility inspired me to try something a bit more dimensional too so I tried decorating this little heart-shaped box too!

lots of dimension here!

Ok, I know this is a bit more advanced but that's because I went a bit crazy with the embellishments on spiral wire and paper roses etc. heehee! I couldn't stop myself!! Lol!! The only decoration on the box here that I improvised with was the pearl border which came from The Range - where I was demoing anyway.
I hope you have enjoyed my selection of makes today. Thankyou for coming by for a nosey!
Have fun and keep crafting!
Love Jak xxx